What Is Reverb? A DTM Beginner’s Guide to Types, Parameters and Tips for Natural Results

The effect that gives vocals and instruments "spaciousness" and "depth" is "reverb."
It is one of the essential effects in DTM, but many people probably struggle with problems like "the sound gets muddy as soon as I add it" or "there are so many types and parameters that I don't know which to choose."
In this article, we explain everything from how reverb works and the characteristics of each type to the meaning of key parameters such as pre-delay and decay, setting guidelines by instrument, and tips for blending it naturally into a mix, in a way that's easy for beginners to understand!
INDEX
What Is Reverb? An Effect That Adds a Sense of Space
Reverb means "reverberation."It is an effect that artificially adds the echoes created as sound reflects off the walls and ceiling of a room and gradually fades away.
Singing in the bathroom sounds good because your voice echoes, and a performance in a hall spreads out softly thanks to this reverberation. When recording, microphones are placed close to the mouth or instrument, so the recorded sound has almost no echo and is "dry." Adding reverb creates the spaciousness and depth of a sound ringing out in a studio or hall.
How Reverb Works: Direct Sound, Early Reflections and Reverberation
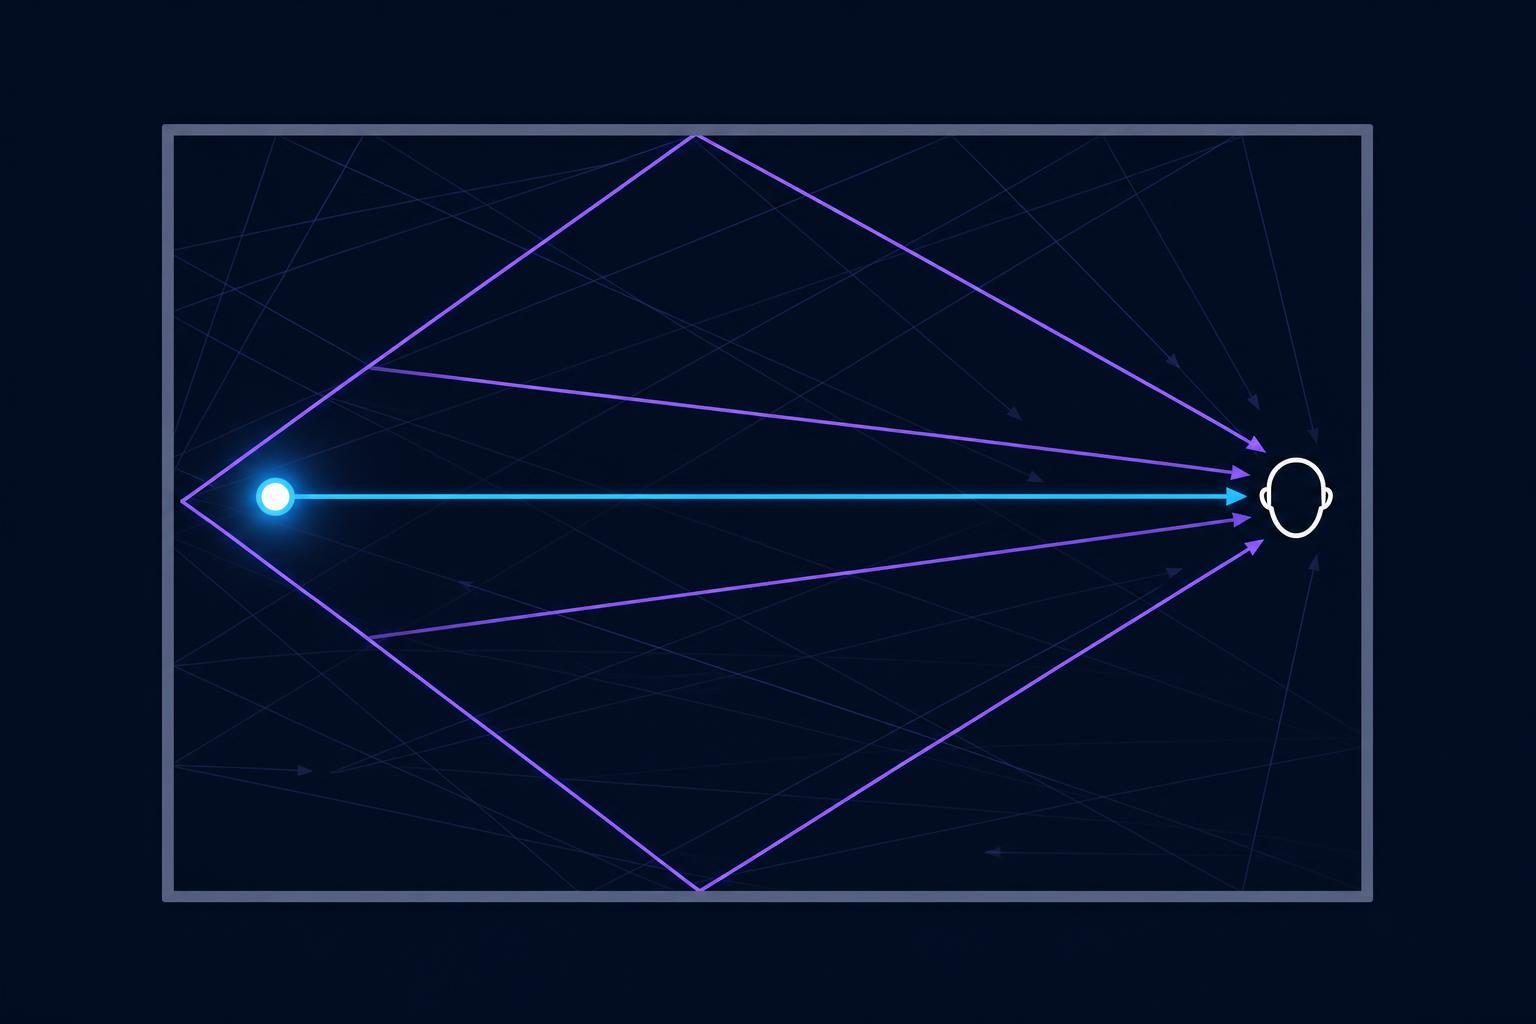
The sound we hear in a room can be roughly divided into the following three types. Reverb is the effect that creates the "early reflections" and "reverberation."
The human ear perceives "how far away the source is" and "how large the space is" from the volume balance between direct and reflected sound and the timing of the reflections. Reverb parameters are what control these.
The Difference Between Reverb and Delay
An effect very similar to reverb is "delay." Delay repeats the original sound at regular intervals like an "echo," and each repetition can be clearly distinguished. Reverb, by contrast, consists of countless reflections densely mixed together, so individual sounds can't be distinguished and it sounds like a smooth "wash."
Types of Reverb and Their Sound
Reverbs come in several types depending on the space or equipment whose reverberation they reproduce. Many reverb plugins let you choose them as presets or modes.
Reverbs are also divided into "algorithmic reverbs," which generate reverberation through calculation, and "convolution reverbs," which reproduce reverberation using data recorded in real spaces (impulse responses). Algorithmic reverbs offer a lot of freedom in sound design and run lightly, while convolution reverbs can reproduce the realistic reverberation of actual halls and churches.
Key Reverb Parameters
The labels differ slightly between reverb plugins, but the key parameters are common to all. Start by learning these five.
1. Pre-Delay
Pre-delay is "the time from when the original sound plays until the reverb starts to be heard," measured in ms (milliseconds).
Setting a slightly longer pre-delay creates a gap between the original sound and the reverb, so you can add reverberation while keeping the outline of the original sound clear. If the lyrics become hard to hear after adding reverb to a vocal, try lengthening the pre-delay to around 20–80ms first.
To match the tempo of the song, you can calculate the length of a quarter note (ms) with "60000 ÷ BPM." For example, at 120 BPM a quarter note is 500ms, and a sixteenth note is a quarter of that, 125ms.
2. Decay / Reverb Time
Decay is "the time it takes for the reverberation to fade away," measured in seconds (s). Some plugins label it "Reverb Time," "RT60" or "Length."
The longer the decay, the larger the space sounds, but if it's too long, the reverberation overlaps the next sound and the whole mix becomes muddy. Keep it shorter for up-tempo songs and longer for slow ballads as a basic rule when adjusting it.
3. Size
Size is the parameter that determines "the size of the simulated space." The larger the size, the longer the intervals between reflections, giving the reverberation of a large space. In many plugins, size changes together with decay, so it's best to adjust while listening to both.
4. Damping and EQ (Damping / Low Cut / High Cut)
Damping adjusts how quickly the high frequencies in the reverberation fade. In a real room, high frequencies are absorbed by curtains and people, so the reverberation gradually becomes duller over time. Increasing damping gives you a calm, warm reverberation.
Many reverbs also feature a low cut (high-pass) and high cut (low-pass). The low end of reverb in particular easily makes a mix muddy, so be sure to make good use of the low cut. The concept of filters is explained in detail in "DAW: What Is a Filter? Master It to Achieve Pro-Level Sound Design".
5. Dry / Wet
Dry/Wet is "the mix ratio of the original sound (dry) and the reverb (wet)," sometimes labeled "Mix." The higher the wet ratio, the farther away the source sounds. When using the "send" method described later, you basically set this to 100% wet.
Insert or Send: Which Should You Use for Reverb?
There are two ways to use effects in a DAW: "insert" and "send." For reverb, the send method is generally used.
With sends, you can easily adjust the amount of reverb for each instrument, such as sending more from the vocal and almost nothing from the bass. To start, simply prepare two reverb tracks, a "short room" and a "long hall or plate," and use them as needed; your mix will become more cohesive.
[By Instrument] Reverb Setting Guidelines
Here are reverb setting guidelines for commonly used instruments. The best values change with the song's tempo, genre and material, so treat these as starting points and adjust by ear.
Adding reverb to low instruments such as kick and bass easily makes the low end muddy, so it is generally not added at all, or only a small amount of very short room reverb is used.
Tips for Blending Reverb Naturally into a Mix
Insert an EQ after the reverb to cut lows and highs
Cutting the low frequencies of the reverb (roughly below 200–500Hz as a guide) can greatly reduce muddiness in the whole mix. Slightly cutting the highs also pushes the reverberation back, making the original sound such as the vocal sound more upfront. For the basics of EQ, also read "What Is an Equalizer (EQ)? Easy-to-Understand Guide".
Use ducking to tame the reverb "only while singing"
Insert a compressor on the reverb track with the vocal as the sidechain signal, and the reverb drops while the singer is singing and blooms softly in the gaps between phrases. This technique combines clear lyrics with spaciousness. Sidechaining is introduced in "What Is a Compressor? A DTM Beginner's Guide to How It Works, the 5 Key Parameters and How to Use It".
Create front-to-back distance with the amount of reverb
The more reverb a sound has, the farther away it sounds; the less, the closer. Using less reverb on the lead vocal or lead instrument and more on background sounds such as pads and harmonies gives the mix natural depth.
Use it as an effect: reverse reverb and gated reverb
"Reverse reverb,"which plays the reverb backward and places it before the original sound, creates a dreamy "sucked-in" effect before a vocal entry or an interlude. And "gated reverb," which abruptly cuts off a long reverb partway through, is a classic technique for the powerful drum sounds popular in 1980s pop music.
Common Beginner Mistakes and How to Fix Them
The subtle reverberation and tails of reverb are easier to judge if you check them on headphones as well as speakers. At the finishing stage, compare by listening in several environments.
Free Reverbs
Reverbs included with DAWs
Start by trying the reverb that comes with your DAW. Ableton Live includes "Reverb," and the higher-end Suite edition also includes "Hybrid Reverb," which combines algorithmic and convolution reverb. Logic Pro includes the easy-to-use algorithmic reverb "ChromaVerb" and the convolution reverb "Space Designer."
Free reverb plugins
There are many free yet highly rated reverb plugins. For example, Valhalla DSP's "Valhalla Supermassive" is a popular free plugin for creating vast, dreamy reverbs and delays. TAL Software's "TAL-Reverb-4" is simple to use and delivers warm, vintage-style reverberation.
*Availability and supported environments may change, so check each developer's official website when downloading.
If you're choosing a DAW, also see "Start Music Production Completely Free: A Comprehensive Comparison of Recommended Free DAWs".
Summary
In this article, we introduced how reverb works and its types, the meaning of key parameters, setting guidelines by instrument and tips for blending it into a mix.
If you keep three points in mind, "use it via sends," "prevent muddiness with a low cut" and "keep the outline of the original sound with pre-delay," your mixes will sound natural and three-dimensional.
Start with a small amount, compare by switching it on and off, and gradually train your ears. For effects that make sound swirl, also check out "How Does a Phaser Work? Creating Enchanting Sound Designs with a Phaser" and "What is a Flanger? A Guide to Using Flangers!"!
Related External Links
Profile

web creator (design + front-end) who loves techno and other music. not only web-related and media business, but also sound production business.
Click here for inquiries,comments, and job requests.